Introduction
Welcome to this comprehensive guide on managing Persistent Volumes (PVs) and Persistent Volume Claims (PVCs) in Kubernetes. In this blog, we'll explore how these essential components work together to provide reliable storage solutions for your applications.
What are Persistent Volumes (PVs) in k8s?

Persistent Volumes (PVs) in Kubernetes (k8s) are a part of the storage abstraction layer. They provide a way for users to abstract the underlying storage from the applications that use it.
Persistent Volumes (PVs) in Kubernetes are like special storage units. They help keep data safe and separate from the programs that use it. Even if a program gets replaced, the data stays put. This is really handy for things like databases or file storage. You can set up these storage units in different ways, either automatically or by hand. It gives you a lot of control over how your data is stored in a Kubernetes system, which is designed to keep things organized and efficient.
What are Persistent Volumes Claim (PVCs) in k8s?

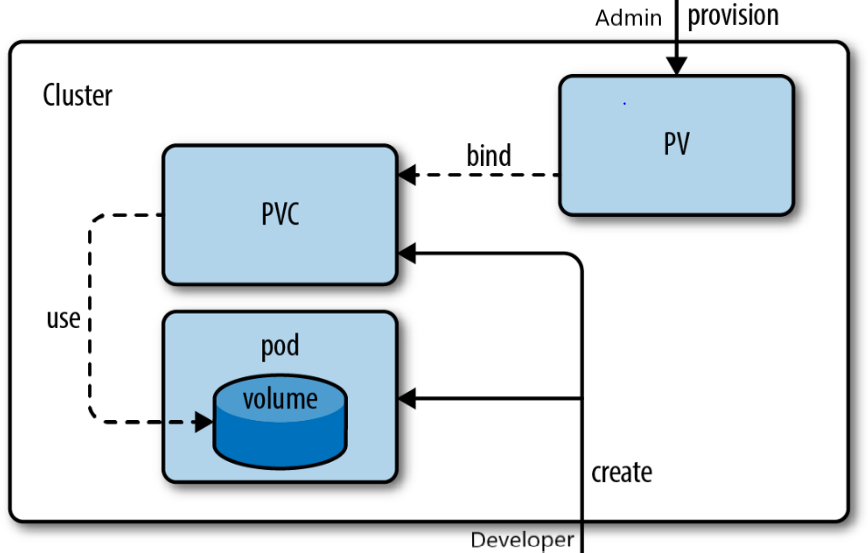
Persistent Volume Claims (PVCs) in Kubernetes (k8s) are like a request for storage. When a pod needs storage, it makes a claim by creating a PVC. It's like saying, "Hey, I need some space to store my data."
The PVC specifies what kind of storage it needs, like how much space and what features it requires. Once the PVC is made, Kubernetes looks for a matching Persistent Volume (PV) that fits the request. If it finds one, it connects the PV to the pod, and the pod can start using it to store data.
How do PVs and PVCs Work Together?

Persistent Volumes (PVs) and Persistent Volume Claims (PVCs) work together in Kubernetes to manage storage for applications.
Think of a PV as a storage unit available for use in the cluster. It's like a locker in a gym, ready to store your stuff.
Now, when a pod needs storage, it creates a PVC. This is like requesting a specific type of locker with certain features, like a specific size or access method.
Kubernetes then looks for a PV that matches the PVC's requirements. If it finds one, it connects the PV to the pod, just like assigning the requested locker to you.
So, in simple terms, PVs are available storage units, and PVCs are the requests for the type of storage needed. Kubernetes acts as the organizer, making sure the right storage unit gets connected to the right pod. This way, applications can store their data reliably and efficiently.
Tasks:
📃Task 1: Adding a Persistent Volume to Your Deployment
Create a Persistent Volume using a file on your node.
  apiVersion: v1
  kind: PersistentVolume
  metadata:
    name: pv-todo-app
  spec:
    capacity:
      storage: 1Gi
    accessModes:
      - ReadWriteOnce
    persistentVolumeReclaimPolicy: Retain
    hostPath:
      path: "/tmp/data"
Create a Persistent Volume Claim that references the Persistent Volume.
  apiVersion: v1
  kind: PersistentVolumeClaim
  metadata:
    name: pvc-todo-app
  spec:
    accessModes:
      - ReadWriteOnce
    resources:
      requests:
        storage: 500Mi
Update your deployment.yml file to include the Persistent Volume Claim. After Applying pv.yml pvc.yml your deployment file look like this
  apiVersion: apps/v1
  kind: Deployment
  metadata:
    name: todo-app-deployment
  spec:
    replicas: 1
    selector:
      matchLabels:
        app: todo-app
    template:
      metadata:
        labels:
          app: todo-app
      spec:
        containers:
          - name: todo-app
            image: simbaa15815/todo-app
            ports:
              - containerPort: 8000
            volumeMounts:
              - name: todo-app-data
                mountPath: /app
        volumes:
          - name: todo-app-data
            persistentVolumeClaim:
              claimName: pvc-todo-app
Apply the updated deployment using the command:
kubectl apply -f deployment.ymlkubectl apply -f deployment.ymlVerify that the Persistent Volume has been added to your Deployment by checking the status of the Pods and Persistent Volumes in your cluster. Use this commands
kubectl get pods,kubectl get pvkubectl get pods -n <namespace-name> kubectl get pv -n <namespace-name>
📃Task 2: Accessing data in the Persistent Volume
Connect to a Pod in your Deployment using command : `kubectl exec -it -- /bin/bash`Verify that you can access the data stored in the Persistent Volume from within the Pod
Certainly, here are the shortened steps:
Connect to the Pod:
kubectl exec -it <pod-name> -- /bin/bashNavigate to Mount Path:
cd <path> #navigate to the directory where the Persistent Volume is mounted.Verify Data:
List files:
lsView file content:
cat <filename>
Exit the Pod:
exit
These steps allow you to easily access and interact with the data in the Persistent Volume
within the Pod.

Conclusion
Thank you for embarking on this journey through the intricacies of Persistent Volumes and Persistent Volume Claims in Kubernetes. With these powerful tools at your disposal, you're well-equipped to ensure data persistence and accessibility for your applications.
Thank you for diving into this blog with me! I trust you found the information both helpful and enlightening. To stay updated on the latest in DevOps 🚀, make sure to follow me. Remember, staying informed means staying ahead in the dynamic world of DevOps!
Feel free to connect with me on LinkedIn for more updates and discussions on DevOps and Kubernetes! 🚀
Happy Learning! Keep pushing those boundaries! 😊

