Table of contents
Introduction
This guide takes you through every step, from setting up your account to launching your first instance successfully. Gain hands-on experience and unlock the full potential of Amazon Web Services on your journey to cloud proficiency.
AWS account setup
Here is a step-by-step guide on how to set up an AWS account:
Navigate to AWS Homepage:
- Go to the AWS homepage.
Click on "Create an AWS Account":
- Locate and click on the "Create an AWS Account" button.
Provide Necessary Information:
- Fill in your email address, choose a strong password, and create an AWS account name.
Complete Contact Information:
- Provide your contact information including full name, company name (if applicable), and phone number.
Payment Information:
- Enter valid payment information. AWS may charge a small amount for verification purposes, but it will be refunded later.
Identity Verification:
- Follow the instructions for identity verification. This may involve receiving a phone call or text message.
Choose a Support Plan:
- Select the support plan that best fits your needs. For beginners, the "Basic Plan" is often sufficient.
Read and Accept AWS Customer Agreement:
- Read the AWS Customer Agreement, and if you agree with the terms, select the checkbox.
Click "Continue":
- Click on the "Continue" button.
Verify Your Identity Again:
- Depending on your location, you may need to complete additional identity verification steps.
Wait for Account Activation:
- AWS will take a moment to set up your account. Once it's ready, you'll receive a confirmation email.
Sign In to Your AWS Account:
- Use the email and password you provided to sign in to your newly created AWS account
Setting up EC2 instance
Sign In to Your AWS Account:
- Go to the AWS Console, and sign in with your credentials.
Navigate to EC2 Dashboard:
From the AWS Management Console, type "EC2" in the search bar.

Launch an Instance:
Click on "Instances" in the EC2 Dashboard and then click "Launch Instance".

Then click on the launch instance. After that give the name to your server

Choose an Amazon Machine Image (AMI):
Select an AMI that suits your needs. You can choose from Amazon Linux, Ubuntu, Windows, etc.

Choose an Instance Type:
Select an instance type based on your requirements. For beginners, a t2.micro instance is often sufficient.

Create a Key Pair:
A key pair is needed to access your instance securely. If you don't have one, create a new one. Remember to download the private key file (.pem) and keep it safe.

View Instances:
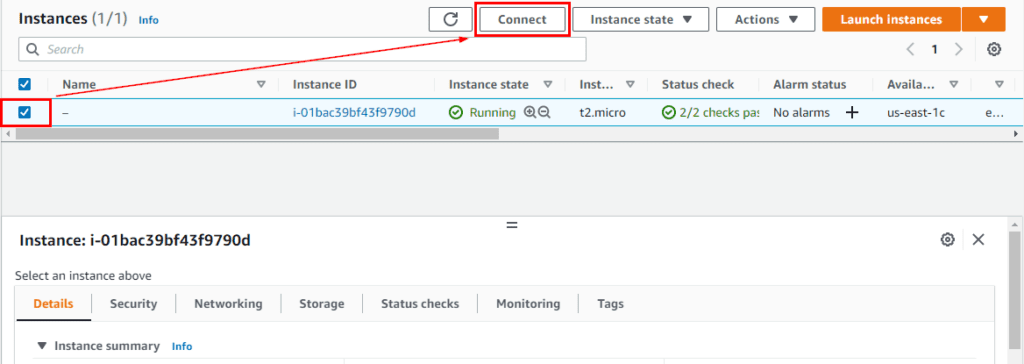
Go back to the EC2 Dashboard, click on "Instances" to see your newly created instance.

Connect Instances:
Once your key pair is created, click "Connect Instances".

Congratulations 🎉 you're now connected to the EC2 instance.

Still having queries watch out the video below 👇
